By the spring of 1967, the Beatles had grown tired of being “the four lads you’d take home to meet your mother.” They had stopped touring, started meditating, and were beginning to dress like they’d just looted a Victorian costume shop. When it came time to design the cover for Sgt. Pepper’s Lonely Hearts Club Band, they didn’t want a simple band photo; they wanted a funeral for their own past, attended by every hero, villain, and occultist who had ever rattled around in their collective subconscious. 🎩
The concept was simple: a crowd of people the Beatles admired (or loathed). But as the lists started coming in from John, Paul, and George, the lawyers at EMI got nervous. McCartney wanted high-brow literati and Hollywood starlets; George Harrison wanted a mountain of Indian gurus to prove his spiritual street-cred; and Lennon, ever the professional provocateur, wanted to see if he could sneak in history’s most famous dictator and the world’s most famous Christian. Both were vetoed by the record company, among others. 🚩
Pop artist Peter Blake and Jann Haworth were tasked with turning this chaotic wishlist into a life-sized collage of cardboard cutouts. It was a logistical nightmare involving telegrams sent to movie stars asking for permission to use their likenesses—most of whom said “yes.” But not everyone was a fan of the idea, leading to a frantic, last-minute game of musical chairs with history’s most famous faces. ✂️
So, behind the vibrant colors and the famous “Beatles” drum skin, a silent war of airbrushing was taking place. As the cameras prepared to click, the record label’s suits intervened, physically hiding the most controversial figures behind the band members or scrubbing them from the negatives entirely. It was the first time a rock album cover had been treated like a state secret, subject to censorship that would make a MI6 agent blush. 🕵️♂️
What remains is a vibrant lie—a masterpiece of editing that tells us as much about what the world wasn’t ready to see as what it was. From the “ghost” of Leo Gorcey to the coverup of Mahatma Gandhi, the album photo is a map of the era’s shifting taboos and the band’s refusal to play by the old rules of celebrity. 🎨 By looking at who they included—and who the censors forced them to remove—we see a band caught between their working-class Liverpool roots, their Hollywood dreams, and a new, radical desire to challenge every boundary in sight.
The Ones Who Didn’t Make It
Adolf Hitler
Who: The dictator of Nazi Germany. Why: Believe it or not, John Lennon requested him. John’s goal was to be as provocative as possible, but the idea was immediately vetoed. A cardboard cutout of Hitler was actually made and brought to the studio—he is visible in several “behind the scenes” outtake photos—but he was carefully positioned so that he was completely obscured by the Beatles themselves in the final shot.
Mahatma Gandhi
Who: The leader of the Indian independence movement. Why: He was originally in the lineup (right next to Lewis Carroll). However, Sir Joseph Lockwood, the head of EMI, became terrified that including Gandhi would cause a riot in India or lead to a ban on the album in the Far East. To protect international sales, Gandhi was painted over with a palm tree at the last minute.
Jesus Christ
Who: The central figure of Christianity. Why: This was another provocative request from John Lennon. However, this was less than a year after John’s “more popular than Jesus” comment had caused Beatles records to be burned in the American South. The record label put their foot down immediately, fearing that putting Jesus on a pop cover would be the final nail in the band’s coffin in the United States.
Leo Gorcey
Who: One of the “Bowery Boys” comedy team. Why: He made the cut for the photo but was airbrushed out later. He was the only person who demanded a fee ($400) for using his likeness. In a legendary show of Beatles “frugality” (or perhaps just principle), they chose to erase him entirely rather than pay the fee.
The “Unknown” Soldier
Who: An anonymous soldier figure. Why: During the shoot, a waxwork of a soldier was placed near the back, but he was shifted around so much during the lighting setup that he effectively vanished behind other taller figures. He exists in the “set,” but he is a ghost on the finished cover.
Sophia Loren
Who: The iconic Italian actress. Why: A longtime favorite of the Beatles, she was originally requested and a cutout was prepared, but like Mae West, there were initial concerns about permissions. Unlike Mae West (who was persuaded by a personal letter from the band), Loren’s placement was eventually swapped out for other figures during the chaotic assembly of the set.
The Ones Who Made It (Back Row)
Sri Yukteswar Giri
Who: A renowned Hindu guru and the author of The Holy Science. Why: He was one of the four Indian gurus suggested by George Harrison, reflecting George’s burgeoning obsession with Eastern philosophy and meditation.
Aleister Crowley
Who: A notorious English occultist, ceremonial magician, and novelist. Why: Suggested by John Lennon. John was fascinated by “outsider” figures and rebels, and Crowley’s “Do what thou wilt” philosophy appealed to the counter-culture spirit of 1967.
Mae West
Who: A legendary American actress and sex symbol of the 1930s. Why: Initially, she refused to appear, famously asking, “What would I be doing in a Lonely Hearts Club?” The Beatles wrote to her, and she changed her mind.
Lenny Bruce
Who: A provocative American stand-up comedian known for his trial regarding obscenity charges. Why: Bruce had died only a year earlier in 1966. The Beatles (especially John) admired his “truth-telling” comedy and his status as a free-speech martyr.
Karlheinz Stockhausen
Who: A German avant-garde composer. Why: Suggested by Paul McCartney. At the time, Paul was deeply into electronic “musique concrète,” which influenced the sound collage of “A Day in the Life.”
W.C. Fields
Who: An American comedian known for his “curmudgeonly” persona. Why: A group favorite. The Beatles loved his sharp, cynical wit, which matched the dry humor they often used in interviews.
Jung-u-Kuo
Who: A high-ranking officer in the Chinese military during the early 20th century. Why: He was another choice by Lennon, who was browsing through books of historical figures. His inclusion adds to the diverse, global “crowd” feeling of the cover.
Edgar Allan Poe
Who: The famous American writer and poet known for his macabre and mystery stories. Why: Suggested by John Lennon. The Beatles often cited Poe as an influence on their more surreal lyrics; John even mentioned him by name later that year in the song “I Am the Walrus.”
Fred Astaire
Who: The legendary American dancer, singer, and actor. Why: He was a personal favorite of the band. Astaire was reportedly “delighted” to be included on the cover, which wasn’t always the case with the Hollywood stars they asked.
Richard Merkin
Who: An American painter and illustrator. Why: Merkin was a friend of the cover’s designer, Peter Blake. His inclusion was a “nod” to the contemporary art scene that Blake was a part of in London during the mid-60s.
The “Ghost” of Leo Gorcey
Who: One of the “Bowery Boys” actors. Why: Gorcey was originally in the lineup, but he was the only person to demand a payment ($400) for the use of his likeness. The Beatles refused to pay, so he was airbrushed out, leaving a distinct, slightly discolored blue gap in the crowd next to Huntz Hall.
Huntz Hall
Who: Another member of the “Bowery Boys” comedy team. Why: Unlike his co-star Leo Gorcey, Hall was happy to appear for free. He remains on the cover, standing right at the edge of the gap where Gorcey used to be.
Simon Rodia
Who: The Italian-American artist who spent 33 years building the Watts Towers in Los Angeles. Why: He was a symbol of “outsider art” and individual perseverance—themes that resonated with the Beatles’ desire to break away from traditional pop music constraints.
Bob Dylan
Who: The folk-rock icon and a massive influence on the Beatles’ transition to “serious” songwriting. Why: By 1967, Dylan was a peer and a friend. His inclusion was mandatory; without Dylan’s influence, the Beatles likely wouldn’t have felt empowered to create an album as experimental as Sgt. Pepper.
Aubrey Beardsley
Who: A famous 19th-century illustrator known for his provocative, black-and-white ink drawings. Why: His “Art Nouveau” style was a major influence on the psychedelic aesthetic of the 1960s. Beardsley’s influence had already appeared on the Beatles’ previous album, Revolver, which featured Klaus Voormann’s Beardsley-inspired line art.
Sir Robert Peel
Who: A 19th-century British Prime Minister and the founder of the modern Metropolitan Police. Why: British police officers are still called “Bobbies” because of him. His inclusion was likely a playful, quintessential British reference—a “nod” to authority figureheads in a decidedly counter-culture collage.
Aldous Huxley
Who: The English author famous for the dystopian novel Brave New World and his essay The Doors of Perception. Why: The Doors of Perception, which detailed his experiences with mescaline, was “required reading” for the 1967 hippie movement. The band The Doors even took their name from his book.
Dylan Thomas
Who: A legendary Welsh poet known for his booming voice and poems like Do not go gentle into that good night. Why: All the Beatles were fans of his work, but Robert Zimmerman (Bob Dylan) famously took his stage name from this poet. By including both Dylans on the same row, the Beatles were acknowledging the lineage of their own inspirations.
Terry Southern
Who: An American satirical novelist and screenwriter who wrote Dr. Strangelove and Easy Rider. Why: He was a friend of the band and a key figure in the “Beat” generation. He actually gave a copy of his book Candy to the Beatles, and his presence on the cover represented the “hip” literary circle they were now a part of.
The Second Row
The second row begins just below and to the left of the top row. These figures are generally seated or positioned slightly lower.
Dion DiMucci
Who: The American singer and frontman of Dion and the Belmonts, famous for hits like “Runaround Sue.” Why: Suggested by artist Peter Blake. Blake was a huge fan of early rock and roll, and he felt Dion represented the cool, “street” energy of the 1950s that paved the way for the British Invasion.
Tony Curtis
Who: A massive Hollywood movie star, known for Some Like It Hot. Why: He was a symbol of the “Old Hollywood” glamour that the Beatles were simultaneously mocking and celebrating. Curtis was apparently very proud to be included and was one of the many stars who signed off on their likeness immediately.
Wallace Berman
Who: An American artist and a crucial figure in the “Assemblage” art movement. Why: He was a friend of the cover’s designer, Robert Fraser. Berman’s art was built on collages of photos and objects, making his inclusion on the world’s most famous collage a meta-tribute to his own style.
Tommy Handley
Who: A beloved British radio comedian, famous for the WWII-era show ITMA (It’s That Man Again). Why: The Beatles grew up listening to him. Handley’s surreal, fast-paced wordplay was a direct ancestor to the Beatles’ own “Lennon-esque” humor and their zany personas in A Hard Day’s Night.
Marilyn Monroe
Who: The ultimate 20th-century screen icon. Why: You can’t have a gathering of “the people we like” without Marilyn. Her presence anchored the cover in pop culture history, though she is tucked slightly toward the middle, partially obscured by the figures in front.
William S. Burroughs
Who: The American “Beat” novelist famous for Naked Lunch. Why: He was a counter-culture icon. Paul McCartney had actually met Burroughs in London and even helped him set up a small experimental recording studio; his presence represented the band’s avant-garde leanings.
Sri Mahavatar Babaji
Who: An ancient Hindu yogi. Why: The second of the four gurus requested by George Harrison. His inclusion highlights the spiritual “center” of the album’s concept.
Sri Lahiri Mahasaya
Who: A 19th-century yogi and disciple of Babaji. Why: The third of George’s gurus. These spiritual figures were George’s way of bringing his “New India” discovery into the heart of the “Swinging London” scene.
Sri Swami Yukteswar Giri
Who: The guru of Paramahansa Yogananda. Why: This was the fourth and final guru on George’s list, ensuring that his spiritual mentors were as well-represented as John’s literary heroes.
Stan Laurel
Who: One half of the legendary comedy duo Laurel and Hardy. Why: A childhood favorite of all four Beatles. Their slapstick humor and “innocent” chemistry were a major blueprint for the Beatles’ own public personas.
Richard Lindner
Who: A German-American painter known for his erotic and “mechanical” human figures. Why: Suggested by Paul. Lindner’s work was bold and colorful, fitting the “Pop Art” explosion of the mid-60s.
Oliver Hardy
Who: The other half of Laurel and Hardy. Why: It was essential to have the duo. Their presence is a nostalgic nod to the pre-war comedy the Beatles grew up watching on BBC television.
Karl Marx
Who: The philosopher and author of The Communist Manifesto. Why: Suggested by John Lennon. John wanted the cover to include “heavy” thinkers and controversial figures to challenge the audience’s expectations of a pop album.
H.G. Wells
Who: The English author and father of modern science fiction (The War of the Worlds). Why: His imaginative “future-thinking” mirrored the Beatles’ attempt to push music into a new, uncharted territory.
Paramahansa Yogananda
Who: The author of Autobiography of a Yogi. Why: He was the most famous of the gurus in the West. George was deeply moved by his book, which helped spark his lifelong spiritual journey.
The Third Row
These figures sit directly behind the Beatles and are often the most difficult to spot because they are partially blocked.
Anonymous (Wax Dummy)
Who: An unidentified female wax figure. Why: Not everyone on the cover was a “celebrity.” To fill out the crowd, the designers used several anonymous wax dummies from Madame Tussauds.
Stuart Sutcliffe
Who: The Beatles’ original bassist who died in 1962. Why: This is one of the most poignant inclusions. John Lennon specifically requested Stu be included so his best friend could be part of the band’s greatest triumph.
Anonymous (Wax Dummy)
Who: Another unidentified wax figure. Why: Used to add depth and the feeling of a “real” crowd behind the stars.
Max Miller
Who: A popular British music hall comedian. Why: Known as “The Cheeky Chappie,” his rapid-fire delivery and colorful suits were a huge influence on the “Vaudeville” style of songs like “Your Mother Should Know.”
A “Petty Girl” (by artist George Petty)
Who: A stylized illustration of a pin-up girl. Why: These illustrations were iconic in the 1940s and 50s. They represented a “classic” era of pop art that Peter Blake wanted to honor.
Marlon Brando
Who: The star of The Wild One and the ultimate symbol of 1950s rebellion. Why: Brando was the original “rebel without a cause.” His image on the cover connects the Beatles’ 1967 rebellion to the rock-and-roll attitude of the decade prior.
Tom Mix
Who: A legendary star of early Hollywood Westerns. Why: He represented the “Hero” archetype of the Beatles’ childhood cinema trips.
Oscar Wilde
Who: The famously witty Irish playwright and poet. Why: Suggested by John. Wilde’s legendary intellect and his status as a social outsider made him a natural hero for the “Summer of Love” generation.
Tyrone Power
Who: A classic Hollywood leading man. Why: Another symbol of the “Silver Screen” glamour that the Beatles grew up admiring.
Larry Bell
Who: A contemporary American artist known for his glass box sculptures. Why: A friend of the cover designers; his inclusion highlighted the “cool” art-world connections the Beatles had cultivated in London.
David Livingstone
Who: The famous Scottish missionary and explorer of Africa. Why: A staple of British history books; his inclusion adds to the “Victorian” feel of the Sgt. Pepper personas.
Johnny Weissmuller
Who: The Olympic swimmer and actor best known as “Tarzan.” Why: Another childhood hero. His inclusion makes the cover feel like a collection of a young boy’s favorite scrapbook clippings.
Stephen Crane
Who: The American author of The Red Badge of Courage. Why: Only his head is visible, tucked behind Issy Bonn. He was a favorite of John Lennon’s for his realistic and gritty writing style.
Issy Bonn
Who: A British music hall singer and comedian. Why: His raised hand in the photo appears just above Paul McCartney’s head, which fueled the “Paul is Dead” conspiracy theorists who claimed it was a sign of a priestly blessing for the deceased.
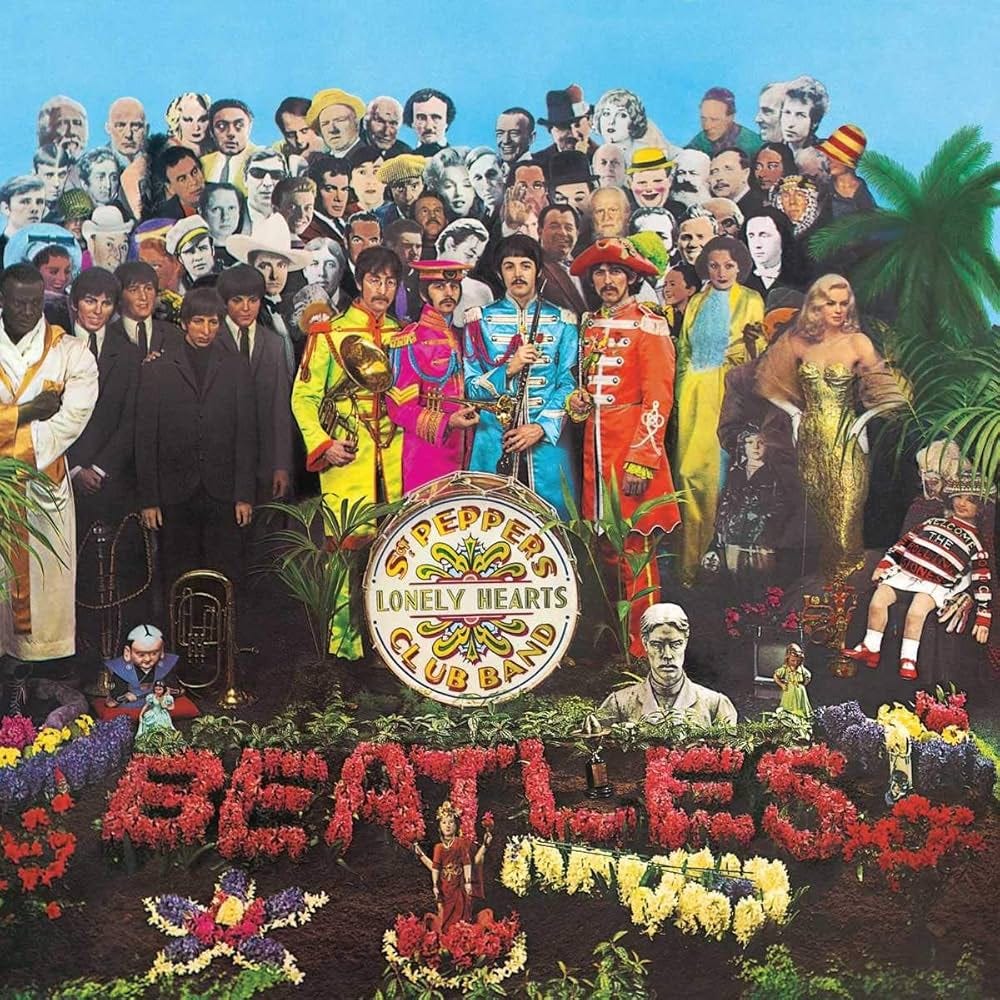
The Front Row & Objects
This is the most crowded and interactive row, featuring wax works and physical props.
The Wax Beatles (1964 Era)
Who: The younger versions of John, Paul, George, and Ringo. Why: On loan from Madame Tussauds. Their presence creates a “passing of the torch” moment—the old Beatles looking down at the new, psychedelic Beatles.
George Harrison (1967)
Who: The man himself. Why: Dressed in his custom-made red military tunic.
John Lennon (1967)
Who: The man himself. Why: Dressed in yellow, wearing his now-iconic “Granny” glasses.
Ringo Starr (1967)
Who: The man himself. Why: Dressed in pink.
Paul McCartney (1967)
Who: The man himself. Why: Dressed in blue.
Albert Stubbins
Who: A famous Liverpool Football Club player. Why: John Lennon insisted on including him because his father liked him. It was a “nod” to their home city and the working-class roots of the band.
Lewis Carroll
Who: The author of Alice in Wonderland. Why: Perhaps the biggest influence on John Lennon’s surrealist lyrics. Without Carroll, we likely wouldn’t have “Lucy in the Sky with Diamonds.”
T.E. Lawrence (”Lawrence of Arabia”)
Who: The British archeologist and military officer. Why: He was a legendary figure of British heroism and eccentricity.
Sonny Liston
Who: The heavyweight boxing champion. Why: Represented as a wax figure. He was the man Muhammad Ali (then Cassius Clay) defeated to become champion—a figure of fading power in the face of the new “youth” movement.
Shirley Temple
Who: The famous child star. Why: She appears twice—once as a doll wearing a sweater that says “Welcome The Rolling Stones,” and once as a cardboard cutout partially hidden behind the wax Beatles.
The “Goddess” Lakshmi
Who: The Hindu goddess of wealth and fortune. Why: A small statue placed among the flowers, another contribution from George Harrison.
The Verdict: A Masterpiece of Controlled Chaos 🏆
Ultimately, the Sgt. Pepper cover remains the most analyzed image in music history because it’s a giant, psychedelic “Where’s Waldo?” for adults. It wasn’t just a marketing tool; it was the Beatles laying their cards on the table. Every face in that crowd represents a thread in the tapestry of who they were—from the intellectual aspirations of Paul to the spiritual seeking of George and the defiant, “let’s-see-what-I-can-get-away-with” attitude of John. 🎸
The irony, of course, is that for all the talk of “Love” and “Universal Consciousness,” the making of the cover was a masterclass in earthly ego. Whether it was John trying to sneak in the ultimate villains or George stacking the deck with his favorite gurus, the cover proves that even at their most “enlightened,” the Beatles were still four competitive lads from Liverpool trying to outdo one another. 🕉️
In the end, the empty spaces—the ones left by Gandhi, Hitler, and Leo Gorcey—are just as important as the faces that made the cut. They serve as a reminder that even the most “revolutionary” band in the world still had to answer to the lawyers, the censors, and the crushing weight of their own fame. The Sgt. Pepper cover didn’t just define an era; it captured the exact moment when rock and roll realized it could be art, so long as the record label didn’t get sued in the process. 🎨
Sometimes the most interesting part of a story isn’t who was invited to the party, but who was quietly escorted out the back door before the flash went off. The Beatles might have been the stars of the show, but the Sgt. Pepper dossier proves that the real “Lonely Hearts Club” was much more crowded, and much more controversial, than they ever let us believe. 🎵